02 JanRecovering a Cracked Dashboard Top
…with a kit from Park Lane Classics.
My car was extensively restored by the previous owner, and to solve the problem of the cracked dash-top he used a popular plastic overlay. While the job was well done and totally seamless, I really didn’t like the feel of the product at all. The plastic was hard and had a strange grain pattern that didn’t really look like either coarse or smooth Triumph interior vinyl. Consequently I bought a kit to recover it in coarse vinyl from Owen.
As you may already know, Triumph used two types of vinyl on 1500 Spitfires; a coarse pattern known as ‘1290 grain’, and a smooth pattern known as ‘stag grain’. My car was an early ’78 and judging by the chassis number, it was one of the very last cars to use coarse grain vinyl, so I took the plunge and ordered this option. I should point out that I ordered a kit for the lower edging too to match, although regrettably didn’t take any photos of the process for that.
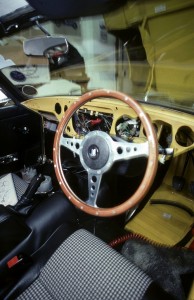 The kits arrived extremely quickly (next day), so I got to work taking the dash apart. It really helps to either label the wires coming from the instruments when you remove them, or take a digital photo to refer back to later. It makes things quicker than using a wiring diagram, and who knows whether the wires are the correct colours or not! The Haynes or Repair Operations manual will be your best friend here, as doing things in the right order makes the job a heck of a lot smoother. It’s so tempting to use force when something gets tricky, but don’t. Dashboards, edgings and instruments are so easily damaged, ask how I know!
I took the opportunity of having the dasboard out to also carry out some paint repairs to the floor – unfortunately a deteriorated door check-strap seal and a few pin-holes in the a pillar / bulkhead area had meant that washing the car caused a small amount of water to pool in the footwell. There was no rust but there was moisture trapped within the paint, and rather than wait to find out what effect this had, the best thing was to sand back the paint layers to get rid of it.
Anyway! Back to the kit. Once the dashboard was removed, I started work on preparing the parts. This is so important in getting a great result, and it’s the only area in which I didn’t follow the instructions. 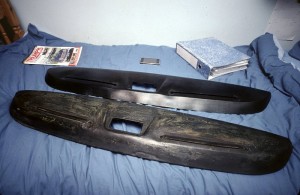 Owen advises to glue polystyrene into damaged sections and sand it back, which I’m sure will work fine but I didn’t really like the idea so used car body filler. The lower edging on the dash was so badly damaged from aggressive removal of the centre support (radio panel) that I used a combination of expanding foam and Isopon P-40 filler. This worked brilliantly as the P-40 is so easy to sculpt into shape, yet the foam has a degree of softness to it. The cracked top section was easier as it was just the hard plastic that had sustained cracks/damage, so I used P-38 filler instead. There’s a lot of sanding involved whether you repair or not since the vinyl adhesive needs a good key, so the repairs weren’t too big an issue.
You can see the damaged dashboard top in the photo above, there’s cracking near the heater vent on the driver’s side and a dent near the front edge. The glue it’s covered in was from the plastic overlay that had been stuck on it, which you can see placed behind it. This all came off when sanding the dash-top in preparation for it’s new vinyl.
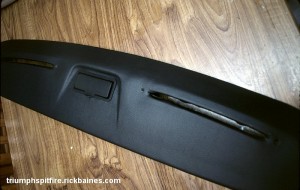 Applying the vinyl was fairly straightforward, what surprised me most was how little pressure there was. You could glue it bit by bit and take days over it, or do it all in one evening like I did. The glue dries quickly, but there’s no requirement to get the whole piece glued in one session. The adhesive Owen recommended cost £1.95 from B&Q, and including the two edging pieces, I think I got through almost three tubes using the glue generously. I used a hairdryer to keep the vinyl warm from time to time, but to be honest I don’t think it’s necessary, it stretches nicely without one. The instructions seemed a bit odd when first reading them, but by the time you come to do each stage, they make perfect sense. The only possible room for improvement with them I could think of would be maybe a slightly more detailed explanation on how to wrap the vinyl at the very ends of the edging whilst minimising wrinkles – it’s the only tricky bit of the job, the rest is easy, so another larger photograph may be helpful.
 Once the piece was finished, I left it a day to settle in, and admire the handywork of course. A note on reassembling – I stupidly wasted an entire morning failing to put the dashboard top back in, and struggling thinking it somehow no longer fit. This is because I hadn’t noticed how it was actually fitted when I removed it from the car. The plastic/vinyl actually curls over the leading edge of the metal, whereas I was trying to rest it on top, and then bolt it down. You would think the huge gap that resulted between the top of the dashboard facia and the dash-top would be a dead giveaway, evidently not. Once I’d realised this epic failure on my part had occurred, the whole thing slotted in quickly and easily.
Inside the car and all assembled, the new vinyl both looked and felt 100 times better. Much more luxurious, and left untreated, compared to the rest of the vinyl it had a matt dark grey look to it that resembled a more modern car interior. This looked very nice, but wasn’t quite as original as I would’ve liked so it got treated with a quick spray and wipe of Autoglym tyre dressing, which deepened the colour from dark grey to a very original-looking shiny black. The vinyl now blends in perfectly with the few bits of original 1978 coarse grain vinyl that are still on the car, and although the pattern isn’t 100% there, it’s bloody close and only an anorak could tell the difference. Basically whereas the original coarse grain varies from very wide to slightly tighter along its pattern, this vinyl is more consistent in width between the grooves. The effect is that it simply looks the same, but of higher quality, and this is probably the closest thing to leather you’ll get in a vinyl.
To surmise, not the easiest job I’ve ever done on this car, but it was fairly straightforward and an interesting departure from mechanical work. The overall effect of spending 25 quid in vinyl, glue and sandpaper will have put far, far more value than that on this car, and I’d happily say its the job I’ve done on the car that I’m most proud of.
For more info about the vinyl kits, check out www.parklaneclassics.co.uk


